Schaut euch mal dieses geniale Video an
http://www.youtube.com/watch?v=NtoYuwmTzt0
Wird das Video nicht zwischendrin irgendwie blasser? Es kommt mir gerade so vor. Hmmm man könnte ja mal die Farben analysieren. Also jedes einzelne Frame in den HSV (H Farbwert, S Sättigung, V Wert) umrechnen, den Mittelwert über alle Pixel bilden und dann grafisch auftragen.
Gesagt, getan.

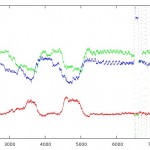
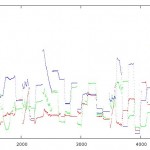
Auf der X-Achse ist die Framenummer aufgetragen. Auf der Y-Achse HSV. Die rote Kurve ist H, grün S und blau V.
Man kann deutlich den Vor- und Abspann erkennen. Sonst bleiben die Werte relativ gleich. Die Kamera bewegt sich aber auch nicht.
Aber drei mal geht die Sättigung runter. Das Bild wird blass und bläulicher. Wie vermutet :)
Schön sind auch noch die ganzen Sprünge zu erkennen, wenn das Bild schnell ein und ausgeblendet wird.
Und hier mein quick&dirty Programm. Habe mplayer genutzt um an die einzelnen Frames zu kommen, da openCV Version 1 so sein Probleme mit Linux und avi hat.
mplayer ../Equilibrium\ -\ Unbesiegt\ Piano\ Cover.flv -vo jpeg -ao null
#include < stdio.h >

#include < stdlib.h >
#include < cv.h >
#include < highgui.h >
#define getPixel(img,x,y) (((uchar*)(img->imageData + img->widthStep*(y)))[x])
#define putPixel(img,x,y,color) (((uchar*)(img->imageData + img->widthStep*(y)))[x] = color)
#define getPixelB(img,x,y) (((uchar*)(img->imageData + img->widthStep*(y)))[x*3])
#define putPixelB(img,x,y,color) (((uchar*)(img->imageData + img->widthStep*(y)))[x*3] = color)
#define getPixelG(img,x,y) (((uchar*)(img->imageData + img->widthStep*(y)))[(x)*3+1])
#define putPixelG(img,x,y,color) (((uchar*)(img->imageData + img->widthStep*(y))) [(x)*3+1] = color)
#define getPixelR(img,x,y) (((uchar*)(img->imageData + img->widthStep*(y)))[(x)*3+2])
#define putPixelR(img,x,y,color) (((uchar*)(img->imageData + img->widthStep*(y)))[(x)*3+2] = color)
using namespace std;
int main()
{
char filename[18] ;
IplImage *image = 0;
IplImage* hsv = 0;
cvNamedWindow("original",1);
int i = 1;
snprintf(filename, 18,"jpg/%08d.jpg",i++);
image = cvLoadImage(filename);
hsv = cvCreateImage( cvGetSize(image), IPL_DEPTH_8U, 3 );
IplImage* h_plane = cvCreateImage( cvGetSize( image ), 8, 1 );
IplImage* s_plane = cvCreateImage( cvGetSize( image ), 8, 1 );
IplImage* v_plane = cvCreateImage( cvGetSize( image ), 8, 1 );
cvCvtPixToPlane( hsv, h_plane, s_plane, v_plane, 0 );
while(1)
{
snprintf(filename, 18,"jpg/%08d.jpg",i++);
image = cvLoadImage(filename);
if(image == 0)
break;
cvCvtColor( image, hsv, CV_BGR2HSV );
cvCvtPixToPlane( hsv, h_plane, s_plane, v_plane, 0 );
float meanh = 0, means = 0, meanv = 0;
for(int y = 0; y < hsv->height; y++)
{
for(int x = 0; x < hsv->width; x++)
{
meanh += getPixel(h_plane, x, y);
means += getPixel(s_plane, x, y);
meanv += getPixel(v_plane, x, y);
}
}
meanh /= image->width * image->height;
means /= image->width * image->height;
meanv /= image->width * image->height;
printf("%f %f %f\n", meanh, means, meanv);
cvShowImage("original", image);
cvWaitKey(10);
cvReleaseImage(&image);
}
}
Wer gern den QtCreator benutzt, hier noch mein .pro File.
SOURCES += main.cpp
INCLUDEPATH += /usr/include/opencv
CONFIG += link_pkgconfig
PKGCONFIG += opencv
Und hier mal ein "normales" Video


