| TV Glozer | Flying only | |||||||||||||
| Name | Kosten | Dmg | Range | Type | freeze | splash | dmg/gold | Dmg | Range | Cooldown | Type | freeze | splash | dmg/gold |
| Ernie Berrt | 10 | 16-26 | 950 | Siege | no | no | 2.3 | |||||||
| Barbara Salesch | 35 | 31-45 | 900 | Chaos | no | no | 1.08 | |||||||
| Günter Jauch | 80 | 51-81 | 850 | Normal | no | yes | 0.83 (2) | 105-250 | 1400 | 0.3 | Pirce | no | yes | 2.2 (8.8) |
| GZSZ | 155 | 146-224 | 950 | Spells | no | no | 1.2 | |||||||
| Anime Guy | 260 | 225-510 | 1100 | Normal | no | yes | 1.4 (3) | |||||||
| MTV VIVA | 390 | 345-440 | 1050 | Chaos | no | yes | 1.0 (2.3) | |||||||
| Big Brother | 800 | 770-1550 | 3000 | Chaos | YES | no | 1.45 | |||||||
|
|
||||||||||||||
| Auslands Helden | ||||||||||||||
| Name | Kosten | Dmg | Range | Type | freeze | splash | ||||||||
| Tengu Man | 10 | 34-46 | 1000 | Pierce | no | no | ||||||||
| Clown Man | 35 | 96-138 | 600 | Normal | no | no | ||||||||
| Aqua Man | 155 | 120-155 | 1200 | Magic | no | no | ||||||||
| Sword Man | 265 | 256-286 | 500 | Pierce | no | no | ||||||||
| Astro Man | 400 | 388-452 | 2000 | Hero | no | no | ||||||||
| Green Devil | 750 | 801-900 | 3000 | Chaos | no | yes | ||||||||
|
|
||||||||||||||
| Aushilfs Helden | Flying only | |||||||||||||
| Name | Kosten | Dmg | Range | Type | freeze | splash | dmg/gold | Dmg | Range | Cooldown | Type | freeze | splash | dmg/gold |
| Spring Man | 10 | 10-14 | 650 | Pierce | no | no | 1.2 (2.4) | |||||||
| Splash Man | 60 | 75-105 | 700 | Magic | no | yes | 1.5 (3) | 1000-2000 | 1500 | 4.0 | Pierce | no | yes | |
| Freeze Man | 150 | 147-149 | 750 | Siege | yes | no | ||||||||
| Shade Man | 225 | 207-263 | 1000 | Pierce | no | no | ||||||||
| Turbo Man | 500 | 510-600 | 1000 | Hero | no | no | ||||||||
| Ninja Mask | 750 | 801-900 | 3000 | Chaos | no | yes | ||||||||
|
|
||||||||||||||
| Aushilfsnazi | ||||||||||||||
| Name | Kosten | Dmg | Range | Type | freeze | splash | ||||||||
| Skinhead | 24 | 22-26 | 600 | Siege | no | yes | ||||||||
| Kämtner | 65 | 48-54 | 300 | Normal | no | no | ||||||||
| Altnazi | 100 | 91-115 | 350 | Normal | no | no | ||||||||
| Parzival | 120 | 101-101 | 1200 | Chaos | no | no | ||||||||
| Faschismus | 340 | 156-204 | 1100 | Magic | no | yes | ||||||||
| Bushido | 550 | 472-516 | 550 | Chaos | no | yes | ||||||||
| Führer | 870 | 951-1050 | 3000 | Chaos | no | no | ||||||||
|
|
||||||||||||||
| Dealer | ||||||||||||||
| Name | Kosten | Dmg | Range | Type | freeze | splash | ||||||||
| Alkopopskonsument | 15 | 17-21 | 650 | Pierce | no | no | ||||||||
| Kettenraucher | 55 | 26-60 | 650 | Siege | no | yes | ||||||||
| LSD Ulli | 125 | 70-115 | 800 | Magic | no | no | ||||||||
| Pornomann | 165 | 169-197 | 1400 | Normal | no | yes | ||||||||
| Z | 300 | 194-218 | 850 | Siege | no | yes | ||||||||
| Xtasy Dude | 410 | 376-406 | 600 | Pierce | no | yes | ||||||||
| David Hasselhoff | 850 | 901-1000 | 3000 | Chaos | no | no | ||||||||
|
|
||||||||||||||
| Gastarbeiter | ||||||||||||||
| Name | Kosten | Dmg | Range | Type | freeze | splash | dmg/gold | |||||||
| Osteuropäer | 5 | 7-13 | 550 | Magic | no | no | 2 (2.5) | |||||||
| Asiate | 20 | 27-33 | 650 | Pierce | no | no | 1.5 (3.0) | |||||||
| Türke | 65 | 65-85 | 700 | Siege | no | yes | 1.15 | |||||||
| Araber | 130 | 79-91 | 950 | Spells | no | no | 0.653 | |||||||
| Italiener | 175 | 107-163 | 950 | Magic | no | no | 0.771 | |||||||
| Holländer | 425 | 206-236 | 1000 | Normal | YES | yes | 0.52 (2.08) | |||||||
| Roberto Blanco | 750 | 801-900 | 3000 | Chaos | no | no | ||||||||
|
|
||||||||||||||
| Haider, Alfons | ||||||||||||||
| Name | Kosten | Dmg | Range | Type | freeze | splash | ||||||||
| Arschficker | 10 | 14-18 | 1000 | Magic | no | no | ||||||||
| Priester | 40 | 21-27 | 1400 | Normal | YES | no | ||||||||
| Lesbe | 90 | 80-110 | 1500 | Normal | no | no | ||||||||
| Gayporn | 135 | 78-150 | 450 | Chaos | no | no | ||||||||
| Ufer wechseln | 200 | 111-125 | 1400 | Normal | no | yes | ||||||||
| Dirk Bach | 350 | 301-400 | 1200 | Pierce | no | yes | ||||||||
| Ronaldo | 750 | 801-900 | 3000 | Chaos | no | no | ||||||||
|
|
||||||||||||||
| Kapital Wessi | ||||||||||||||
| Name | Kosten | Dmg | Range | Type | freeze | splash | ||||||||
| Polizist | 25 | 17-21 | 800 | Siege | no | yes | ||||||||
| Kapitalist | 70 | 43-49 | 300 | Normal | no | no | ||||||||
| Manager | 110 | 86-110 | 300 | Normal | ?? | no | ||||||||
| CDU/CSU | 150 | 131-131 | 1200 | Chaos | no | no | ||||||||
| Finanzhai | ||||||||||||||
| Otto Waalkes | ||||||||||||||
| Schröder | ||||||||||||||
|
|
||||||||||||||
| Nachwuchs Rapper | ||||||||||||||
| Name | Kosten | Dmg | Range | Type | freeze | splash | dmg/gold | |||||||
| Möchtergern Rapper | 10 | 15-19 | 1000 | Pierce | no | no | 1.7 (3.4) | |||||||
| Freestyler | 50 | 27-33 | 900 | Pierce | no | no | 0.6 (1.2) | |||||||
| Fler | 90 | 67-87 | 700 | Spells | no | yes | 0.856 | |||||||
| Sido | 120 | 63-90 | 500 | Hero | no | no | 0.667 | |||||||
| Dendeman | 200 | 155-200 | 600 | Spells | no | yes | 0.89 | |||||||
| Bushido | 550 | 472-516 | 550 | Chaos | no | yes | 0.9 | |||||||
| Aggro Berlin | 750 | 801-900 | 10000 | Chaos | no | no | ||||||||
|
|
||||||||||||||
| Ossi Arbeiter | ||||||||||||||
| Name | Kosten | Dmg | Range | Type | freeze | splash | ||||||||
| Soldat | 12 | 17-21 | 800 | Pierce | no | no | ||||||||
| Mitläufer | 45 | 51-57 | 750 | Pierce | no | no | ||||||||
| Mauerwachturm | 90 | 65-85 | 700 | Siege | no | yes | ||||||||
| SED Zentrale | 140 | 104-116 | 700 | Spells | no | no | ||||||||
| Stasi Offizier | 230 | 147-203 | 950 | Magic | no | no | ||||||||
| Erich Honecker | 375 | 226-256 | 1000 | Normal | no | yes | ||||||||
| Karl Marx | 750 | 801-900 | 3000 | Chaos | no | no | ||||||||
|
|
||||||||||||||
| Pro Gamer | ||||||||||||||
| Name | Kosten | Dmg | Range | Type | freeze | splash | ||||||||
| Konsolennoob | 10 | 11-12 | 800 | Pierce | no | no | ||||||||
| WoW Zocker | 40 | 21-27 | 900 | Magic | no | no | ||||||||
| C&C Kaputti | 85 | 64-80 | 600 | Siege | no | yes | ||||||||
| UT Bekloppter | ||||||||||||||
| W3 Zocker | ||||||||||||||
| Diablo Freak | ||||||||||||||
| CS Owner | 700 | 751-850 | 3100 | Chaos | no | no | ||||||||
|
|
||||||||||||||
| Udo Jürgens | ||||||||||||||
| Name | Kosten | Dmg | Range | Type | freeze | splash | ||||||||
| Pensionist | 14 | 16-24 | 800 | Pierce | no | no | ||||||||
| Leprakranker | 55 | 64-80 | 1400 | Siege | no | yes | ||||||||
| Coolman | 135 | 110-130 | 1080 | Magic | no | yes | ||||||||
| Dauererektion | 200 | 109-137 | 800 | Chaos | no | no | ||||||||
| aids kranker | 265 | 236-266 | 950 | Spells | no | no | ||||||||
| Michael J Fox | 450 | 356-410 | 800 | Siege | no | yes | ||||||||
| Mr T | 800 | 801-900 | 3000 | Chaos | no | no | ||||||||
07.02.2024
Analyse: Frozen Throne: Randgruppen TD2 Rapper Mod
Comments Off on Analyse: Frozen Throne: Randgruppen TD2 Rapper Mod
01.01.2024
Analye: Frozen Throne Tower Defense Warcraft III
Flame
40 70 110 150 260
40-80 60-150 90-300 150-750 240-1800
800 1000 1200 1500 1800
Lightning
Geld 40 60 80 120 150
Schaden 80-160 120-300 175-525 230-800 340-1500
Reichweite 1300 1500 1750 2000 2300
Froizen
60 80 100 120 80
30-70 40-130 55 -265 80-460 135-1325
800 1000 1200 1500 1800
Fizz Tower
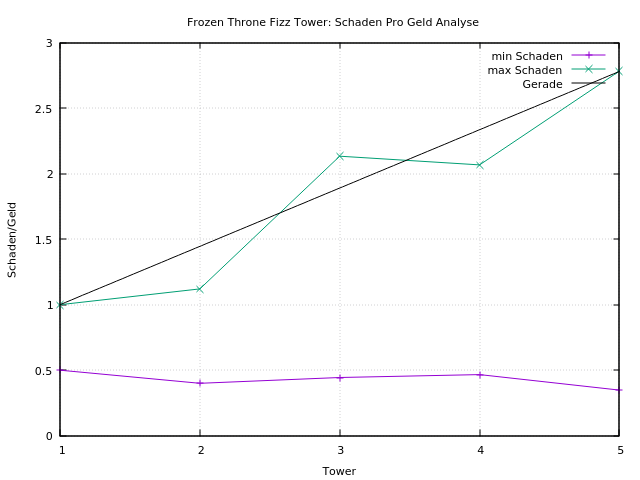
Bei Tower 5 bekommt man den meisten schaden pro Geld. Das ist erst mal nicht verwunderlich. Aber der ist teuer und man kann ihn sich nicht leisten. Stattdessen also viel Tower 1 2 oder 3 kaufen? Tower 4 ist Betrug, man bekommt weniger Schaden pro Geld als bei Tower 3. Der Tower 3 schneidet am besten ab. Also diese bauen wie Sand am Meer.
Canon Tower
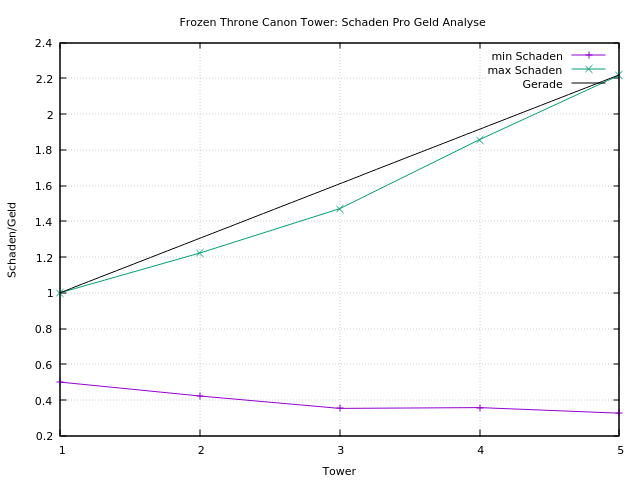
Bei den Cannonball Towers gibt es keine Präferenz bezüglich Schaden pro Geld. Zwar gibt es bei Tower 2,3 und 4 weniger Schaden pro Geld, aber durch die Splash Damage Funktion gleicht sich das wieder aus. Tipp: Die Tower erst aufrüsten wenn nötig, damit mehr Geld für die Fizzfizz Tower übrig ist.
Flame Tower
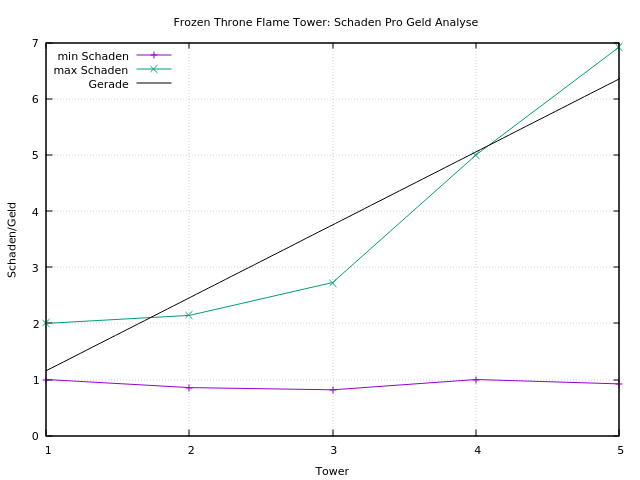
Der Flame Tower ist schon in der ersten Ausbau Stufe mit 2 Schaden pro Geld so gut wie der Canon Tower in vollem Ausbau, aber natürlich nicht so start. Der Schaden pro Geld Ratio steigt ab Ausbau Stufe 4 und 5 sehr stark an. Allerdings sind diese sehr teuer, so dass man sie nur im fortgeschrittenen Spiel bauen kann und sollte.
Lightning Tower
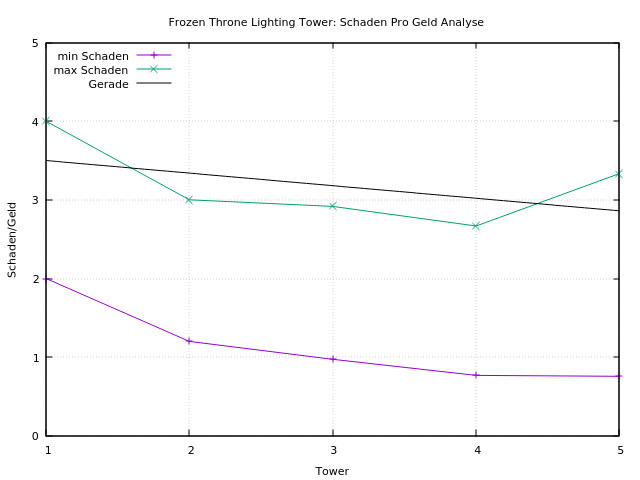
Den Lightning Tower auszubauen lohnt nicht! Man bekommt immer weniger Schaden pro Geld. Natürlich steigt die Reichweite des Towers, aber da die Flieger in der Regel sehr schnell unterwegs sind, kann der Tower so oder so nicht oft schließen. Womöglich bringt es etwas, den Tower an eine Ecke zu stellen, wo die Flieger eine Kehrtwendung machen.
Reichweiten Vergleich
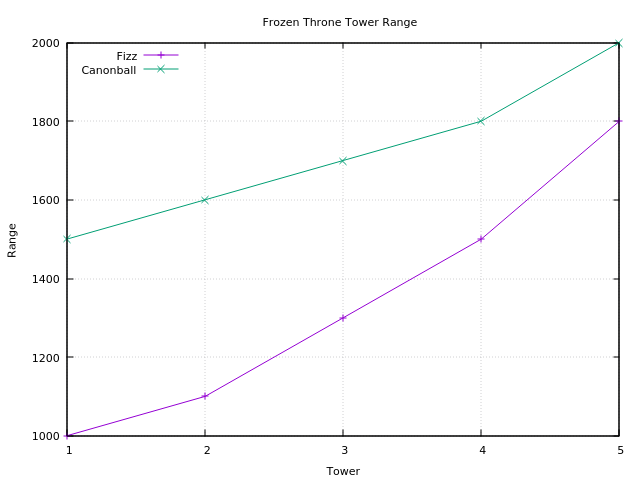
Die Reichweite des Canonballtowers ist im Mittel grob 1.3 mal höher als die des Fizz Towes. Daher diesen Tower dort platzieren wo er lange gerade Stecken beschießen kann, ohne dass der Turm sich viel drehen muss.
Map Analyse von Azote Vil's TEAM TD v1.3 (99Lv)
Tower Kosten 10 15 20 30 40 = 115
Strategie: Die Gegner laufen im Waagrechten und zweiten senkrechten Teil in einer Linie, fast mittig näher zur Inneren Mauer hin. Mit Tower die Gegner aufhalten ist nicht nötig. Die Flieger sind das größte Problem.
Flying Levels: 10 14 16 18 26 27 31 44 45 46 64 68 69 70 71 73 74
Rekord: Level 72
Level Geld
start 50
1 50 + 20
2 55 + 20
3 +20
4 +20
5 +20
6 +20
7 +20
8 +20
9 +20
10 +20 5-6 tower nötig
11 +20
12 +20
13 +40 !
14 +40 9 tower nötig
15
16 +2 10 langen nicht
17
18 +2 12 langen nicht
19 +2
20 +2
21 +2
22 +2
23 +2
24 +2
25 +3
26 +3 18 langen nicht
27 +3 19 langen nicht
28 +3
29 +3
30 +3
31 +3 22 lange nicht
32 +3
33 +3
34 +3
35 +3-6
36 +4
37 +4-6
38 +30-35
39 +4
40 +4
41 +4
42 +4
43 +4
44 +4 44 langen nicht
45 +4 44 lange nicht
46 +25 fliege
47 +4
48 +4
49 +5
50 +5
51 +5
52 +5
53 +5
54 +5
55 +5
56 +5
57 +5
58 +5
59 +5
60 +6
61 +6
62 +6
63 +6
64 +6 74 alle
65 +6
66 +6
67 +6
68 +6 78 eioner durhc
69 +6 3 durch
70 +7 7 durch
71 +7 11 durch
72
Comments Off on Analye: Frozen Throne Tower Defense Warcraft III
08.12.2023
24.07.2023
C++ Guns: DOS codepage 437 to UTF8
Wenn die üblichen Encodings wie UTF8, Latin1, ISO-8859-15 nicht funktionieren kann man CP437 versuchen. Das ist der Original-Zeichensatz des IBM-PC ab 1981. Dieser enthält Umlaute die in den üblicherweise eingestellten Encodings nicht angezeigt werden.
Hier mein erster Versuch CP437 nach UTF8 zu konvertieren. Die Sourcecode Datei und der Compiler und das ganze Betriebssystem ist selbstverständlich auf UTF8 eingestellt, sonst funktioniert es nicht.
std::string cp437toUTF8(std::string_view str) {
    std::string result;
    result.reserve(str.size());
    for(unsigned char c : str) {
        switch(c) {
        case 129: result.append("ü"); break;
        case 132: result.append("ä"); break;
        case 142: result.append("Ä"); break;
        case 148: result.append("ö"); break;
        case 153: result.append("Ö"); break;
        case 154: result.append("Ü"); break;
        case 225: result.append("ß"); break;
        default: result.push_back(c);
        }
    }

    return result;
}
[1] https://de.wikipedia.org/wiki/Codepage_437
[2] https://www.ascii-code.com/CP437
Comments Off on C++ Guns: DOS codepage 437 to UTF8
28.06.2023
Ganglia SSD Metrics
GMETRIC="/usr/bin/gmetric -c /etc/ganglia/gmond.conf"
DEV=/dev/sda

temperature=$(sudo smartctl -A $DEV | grep Temperature_Celsius |  awk '{print $10}')
Reallocated_Sector_Ct=$(sudo smartctl -A $DEV | grep Reallocated_Sector_Ct |  awk '{print $10}')
Current_Pending_Sector=$(sudo smartctl -A $DEV | grep Current_Pending_Sector |  awk '{print $10}')
Offline_Uncorrectable=$(sudo smartctl -A $DEV | grep Offline_Uncorrectable |  awk '{print $10}')
UDMA_CRC_Error_Count=$(sudo smartctl -A $DEV | grep UDMA_CRC_Error_Count |  awk '{print $10}')
Program_Fail_Count_Chip=$(sudo smartctl -A $DEV | grep Program_Fail_Count_Chip |  awk '{print $10}')
Erase_Fail_Count_Chip=$(sudo smartctl -A $DEV | grep Erase_Fail_Count_Chip |  awk '{print $10}')
Wear_Leveling_Count=$(sudo smartctl -A $DEV | grep Wear_Leveling_Count  |  awk '{print $10}')
Used_Rsvd_Blk_Cnt_Chip=$(sudo smartctl -A $DEV | grep Used_Rsvd_Blk_Cnt_Chip  |  awk '{print $10}')
Program_Fail_Cnt_Total=$(sudo smartctl -A $DEV | grep Program_Fail_Cnt_Total  |  awk '{print $10}')
Erase_Fail_Count_Total=$(sudo smartctl -A $DEV | grep Erase_Fail_Count_Total  |  awk '{print $10}')

echo "temperature" $temperature
echo "Reallocated_Sector_Ct" $Reallocated_Sector_Ct
echo "Current_Pending_Sector" $Current_Pending_Sector
echo "Offline_Uncorrectable" $Offline_Uncorrectable
echo "UDMA_CRC_Error_Count" $UDMA_CRC_Error_Count
echo "Program_Fail_Count_Chip" $Program_Fail_Count_Chip
echo "Erase_Fail_Count_Chip" $Erase_Fail_Count_Chip
echo "Wear_Leveling_Count " $Wear_Leveling_Count
echo "Used_Rsvd_Blk_Cnt_Chip" $Used_Rsvd_Blk_Cnt_Chip
echo "Program_Fail_Cnt_Total" $Program_Fail_Cnt_Total
echo "Erase_Fail_Count_Total" $Erase_Fail_Count_Total


$GMETRIC  -t float -n "Temperature" -u "Celcius" -g "SSD" -v $temperature
$GMETRIC  -t float -n "Reallocated_Sector_Ct" -g "SSD" -v $Reallocated_Sector_Ct
$GMETRIC  -t float -n "Current_Pending_Sector" -g "SSD" -v $Current_Pending_Sector
$GMETRIC  -t float -n "Offline_Uncorrectable" -g "SSD" -v $Offline_Uncorrectable
$GMETRIC  -t float -n "UDMA_CRC_Error_Count" -g "SSD" -v $UDMA_CRC_Error_Count
$GMETRIC  -t float -n "Program_Fail_Count_Chip" -g "SSD" -v $Program_Fail_Count_Chip
$GMETRIC  -t float -n "Erase_Fail_Count_Chip" -g "SSD" -v $Erase_Fail_Count_Chip
$GMETRIC  -t float -n "Wear_Leveling_Count" -g "SSD" -v $Wear_Leveling_Count
$GMETRIC  -t float -n "Used_Rsvd_Blk_Cnt_Chip" -g "SSD" -v $Used_Rsvd_Blk_Cnt_Chip
$GMETRIC  -t float -n "Program_Fail_Cnt_Total" -g "SSD" -v $Program_Fail_Cnt_Total
$GMETRIC  -t float -n "Erase_Fail_Count_Total" -g "SSD" -v $Erase_Fail_Count_Total
Comments Off on Ganglia SSD Metrics
19.06.2023
C++ Guns: How to convert from UTC to local time in C++?
Convert from a broken down date time structure from UTC to localtime in C++.
See Stackoverflow: How to convert from UTC to local time in C?
I converted the code from C to C++ and make it shorter.
// replace non std function strptime with std::get_time

#include <iostream>
#include <sstream>
#include <iomanip>
#include <ctime>

/*
  Convert from a broken down date time structure from UTC to localtime.
  See https://stackoverflow.com/questions/9076494/how-to-convert-from-utc-to-local-time-in-c
*/
std::tm UTC2localtime(std::tm tp) {
  // make sure Daylight saving time flag is not accidentally switched on in UTC time
  tp.tm_isdst = 0;

  // get seconds since EPOCH for this time
  const time_t utc = std::mktime(&tp);
  std::cout << "UTC date and time in seconds since EPOCH: " << utc << "\n";

  // convert UTC date and time (Jan. 1, 1970) to local date and time
  std::tm e0{};
  e0.tm_mday = 1;
  e0.tm_year = 70;

  // get time_t EPOCH value for e0. This handles daylight saving stuff.
  // The value is e.g. -3600 for 1h difference between the timezones
  const time_t diff = std::mktime(&e0);

  // calculate local time in seconds since EPOCH
  const time_t local = utc - diff;
  std::cout << "local date and time in seconds since EPOCH: " << local << "\n";

  // convert seconds since EPOCH for local time into local_tm time structure
  std::tm local_tm;
  if(localtime_r(&local, &local_tm) == nullptr) {
    throw std::system_error(errno, std::generic_category(), "UTC2localtime(): in conversion vom UTC to localtime");
  }
  return local_tm;
}

int main() {
  // hard coded date and time in UTC
  std::string datetime = "2013 11 30 23 30 26";
  std::cout << "UTC date and time to be converted in local time: " << datetime << "\n";

  // put values of datetime into time structure
  std::tm UTC_tm{};
  std::istringstream ss(datetime);
  ss >> std::get_time(&UTC_tm, "%Y %m %d %H %M %S");

  if(ss.fail()) {
    throw std::runtime_error("Can not parse datetime from datetime '" + datetime + "' to format %Y %m %d %H %M %S");
  }

  const std::tm local_tm = UTC2localtime(UTC_tm);
  std::cout << "local date and time: " << std::put_time(&local_tm, "%Y-%m-%d %H:%M:%S %Z") << "\n";
}
Comments Off on C++ Guns: How to convert from UTC to local time in C++?
15.04.2023
AVR-GCC 15 für Linux installieren / compilieren
Es gibt bereits eine sehr gute Anleitung für das Installieren vom avr-gcc [1] [2] ..., aber sie sind veraltet. Ich werde im folgenden nur das beste von diesen Artikel übernehmen.
Zusammenfassung:
Der AVR 8-Bit RISC Mikrocontroller von Atmel ist ein sehr verbreiteter Mikrocontroller. Es ist nur ein Chip mit EEPROM, RAM, Analog zu Digital Umwandler, einer Menge digitaler Ein- und Ausgabezeilen, Timern, UART für RS 232 Kommunikation und vielen anderen Dingen.
Das beste ist jedoch, dass es dafür unter Linux eine vollständige Programmierumgebung gibt: Man kann diesen Mikrocontroller in C++ programmieren, mit dem GCC Compiler.
Die Anleitung ist in mehrere Teile gegliedert. Im ersten Teil wird die Installation erklärt. IM zweiten ein kleines Testprojekt. Im dritten wird gezeigt, wie man damit denn nun seine Programme für den AVR erstellt. Im vierten Teil stehen noch ein paar typische Fehlermeldungen und die Lösungen. Und im letzten ein paar weiterführende Links.
Fertige Pakete
Leider gibt es zu diesem Zeitpunkt (04.2023) keine aktuellen AVR GCC Pakete in den Repositories der Distributionen. Es führt also kein Weg am compilieren vorbei. Wenn die Repositories aktualisiert werden, werde ich das hier vermerken.
Ausnahme bildet das Paket avrdude, dass mit Version 6.3 (2016, Debian 11 bullseye) zwar auch schon etwas älter ist, aber dennoch wird es funktionieren. In der nächsten Debian Version, welche wahrscheinlich im Juni 2023 veröffentlicht wird, ist ein aktuelleres avrdude mit der Version 7.1 dabei. Auf er github Seite von avrdude [7] gibt es Informationen, wie man jetzt schon die neuste Version bekommt.
Avrdude lässt sich mit dem folgenden Befehl aus den Repositories installieren:
# apt-get install avrdude
Eure Voraussetzungen
Ihr müsst grundsätzliche Linux Kenntnisse mitbringen und den Willen sich durch die Anleitung durch zu beißen. Es kann an der ein oder andere Stelle Probleme geben, dann Ruhe bewahren und meist findet man die einfache Lösung schnell von selbst.
AVR GCC compilieren
Also los. Wir brauchen folgende Software:
binutils
binutils-2.44.tar.bz2
oder
binutils-2.44.tar.bz2
avr libc
avr-libc-2.2.1.tar.bz2
Um möglicherweise bestehende AVR GCC Installationen nicht zu überschreiben, werden die Programme nach ~/bin/avrgcc-15 installiert.
Software Voraussetzungen
Um einem Compiler zu compilieren ist Voraussetzung, dass schon ein Compiler installiert ist - logisch.
Welche Pakete dafür zu installieren sind, variiert etwas zwischen den unterschiedlichen Linux Distributionen. Aber für Debian basierte System ist es im wesentlichen das Paket build-essential sowie das Paket texinfo für binutils.
# apt-get install build-essential texinfo
binutils compilieren
Das binutils Paket enthält alle nötigen low-level Utilities, um Objektdateien zu bauen. Es beinhaltet einen AVR assembler (avr-as), Linker (avr-ld), library handling tools (avr-ranlib, avr-ar), Programme, zum Erzeugen von Objektdateien, die auf das EEPROM des Microcontrollers (avr-objcopy) geladen werden können, disassembler (avr-objdump) und utilities wie avr-strip und avr-size.
Und so wird's gemacht:
$ tar xjf binutils-2.44.tar.bz2

$ cd binutils-2.44

$ mkdir build

$ cd build

$ ../configure --target=avr --disable-nls --prefix $HOME/bin/avrgcc-15

$ make -j 2

$ make install
Die Kompilation dauert etwa ein bis zwei Minuten.
Die binutils ist nun in dem Verzeichnis $HOME/bin/avrgcc-15/ installiert. Um sie auch aufrufen zu können, muss das Verzeichnis der PATH Umgebungsvariable hinzugefügt werden. Dies geschieht mit folgenden Kommando:
$ export PATH=$HOME/bin/avrgcc-15/bin/:$PATH
Nun testen wir, ob auch alles klappt. Mit dem Programm 'witch' wird überprüft ob eines der binutils Programme, genauer gesagt das Programm avr-objcopy, erreichbar ist.
$ which -a avr-objcopy

/home/kater/bin/avrgcc-15/bin/avr-objcopy

/usr/bin/avr-objcopy
Da ich zwei Installationen des avr gcc habe, eine alte Systeminstallation mit dem GCC 5 und die neue mit dem GCC 15, werden bei mir zwei Zeilen ausgegeben. Wichtig ist, dass die neue Installation, also der Path /home/kater/bin/avrgcc-15/ ganz oben steht, denn dieser wird als erstes durchsucht.
Um das avrgcc Verzeichnis dauerhaft in der PATH Variablen zu seichern, tragt ihr die export Zeile an das Ende der .bashrc Datei ein, die sich im Homeverzeichnis befindet.
AVR GCC compilieren
avr-gcc ist unser eigentlicher Compiler. Diesen zu compilieren ist der aufwendigste Teil, da es am längsten dauert und beim Compilieren am meisten schief gehen kann.
Die für den GCC notwendigen Pakete wie gmp, mpfr, mpc und isl müssen nicht von Hand installiert werden. Dies kann durch das Skript contrib/download_prerequisites erledigt werden. Am besten führt ihr folgende Befehle Schritt für Schritt aus und achtet auf mögliche Fehlermeldungen die kommen könnten. Nicht einfach blind die Befehle copy&pasten!
$ tar xzf gcc-15.1.0.tar.gz

$ cd gcc-15.1.0/

$ ./contrib/download_prerequisites

$ mkdir build

$ cd build/

$ ../configure --target=avr --disable-nls --enable-languages=c,c++ --disable-libssp  --with-double=64 --with-long-double=64 --prefix $HOME/bin/avrgcc-15/

$ make -j 2

$ make install
Das Kompilieren hat bei mir etwa 35 Minuten gedauert. Genug Zeit um gemütlich den nächsten Absatz zu lesen ;)
Die Optionen von configure bedeuten folgendes
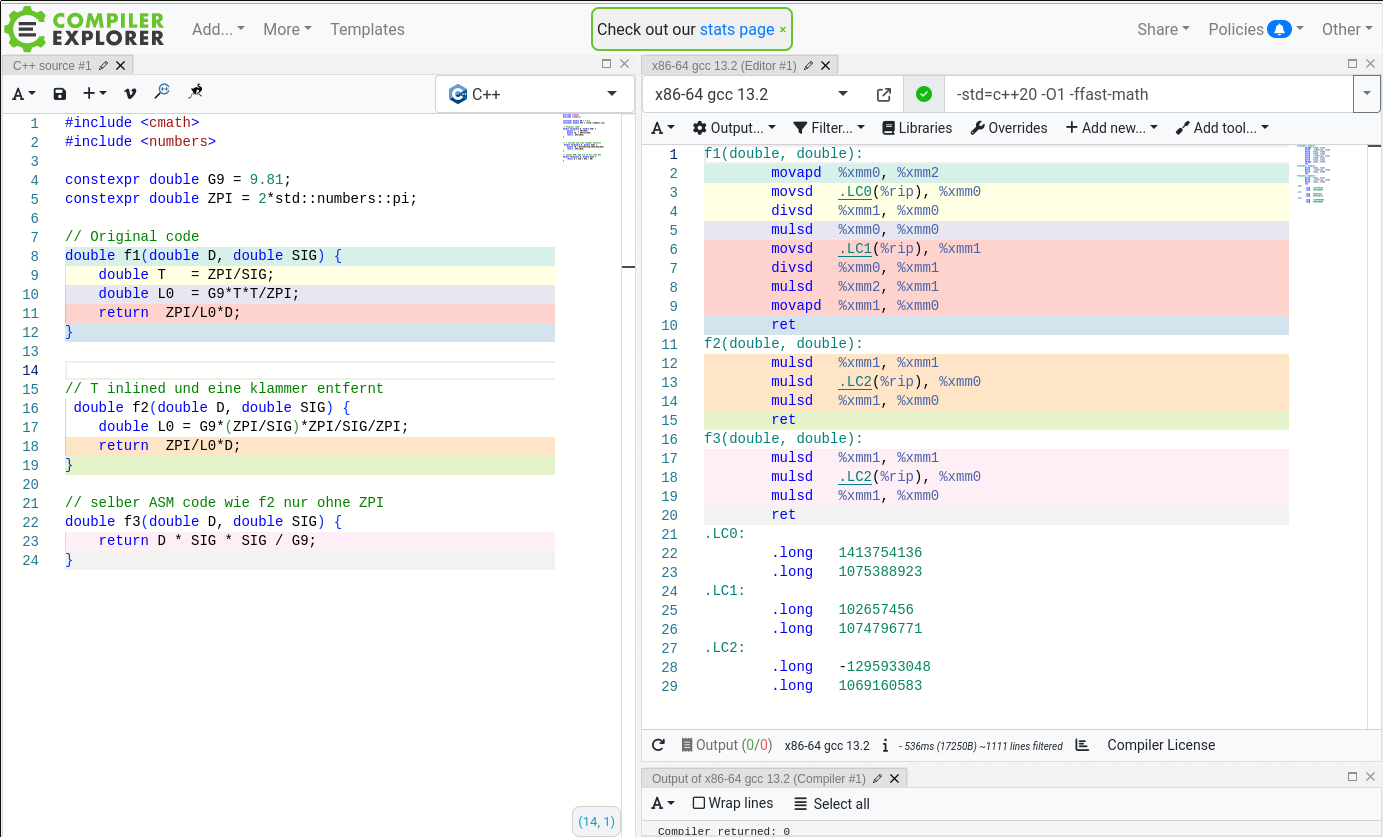
Der letzte Punkt bedarf etwas Erklärung. Wir alle wissen, dass (32/64bit) Gleitkommaberechnungen auf einem 8bit Controller nicht unbedingt die beste Idee ist, da dies sehr viele Instruktionen erzeugt und der Speicherplatz sehr beschränkt ist. Es ist technisch möglich, aber man will es in der Praxis vermeiden. Wahrscheinlich ist das der Grund, warum der double-precision Typ für AVR auch auf 32bit eingestellt ist, statt 64bit. Anders sieht das bei Berechnungen zur Kompilierzeit aus. Diese werden auf einem normalen Computer erledigt, der im Vergleich zum AVR unendlich viel Speicherplatz hat und auch millionenfach schneller ist. Seit C++11 mit constexpr können bequem in normalen Code Berechnungen zur Kompilierzeit ausgeführt werden, es ist kein Gefummelt mit Makros mehr nötig. Und die Möglichkeiten werden mit jeder neuen C++ Version stetig verbessert. Zum Beispiel gibt es in C++23 (GCC13) das Keyword "consteval" welches garantiert, dass eine Funktion nur zur Kompilierzeit ausgeführt wird. Genau das Richtige für Mikrocontroller! Es spricht also nichts dagegen Berechnungen, die zur Kompilierzeit ausgeführt werden, mit 64bit double zu berechnen.
Hier ein Beispiel das Probleme mit 32bit double Typen aufzeigt: die UBRR Berechnung für den USART. Wie genau die Berechnung aussieht ist dabei egal, wichtig ist nur, dass die Eingangswerte, die CPU Frequenz (z.B 20000000Hz) und die Baudrate (z.B. 1000000), als 32bit integer vorliegen müssen, da die Zahlen für 16bit Typen zu groß sind. Nun kann eine 32bit Ganzzahl nicht verlustfrei in eine 32bit Gleitzahl konvertiert werden, was in einer Warnung (oder Fehler je nach Einstellung) resultiert. Für diesen Fall wissen wir, dass der Verlust an Ziffern kein Problem ist, da wir die möglichen CPU Frequenz und Baud Rate kennen, aber wenn nicht mal dieses eine Beispiel zu 100% mit 32bit double funktioniert, wie soll das erst mit komplizierten Berechnungen funktionieren?!
Aus diesem Grund habe ich double, wie gewohnt, auf 64bit eingestellt. Wenn man auf dem AVR unbedingt Gleitkommaberechnugen braucht, kann man den Typ float nutzen und alles ist wie immer.
So, nach diesen Gedanken sollte die Kompilation fertig sein :)
Zum Abschluss starte ich den Compiler und lasse mir die Versionsnummer ausgeben
$ avr-gcc --version

avr-gcc (GCC) 15.1.0
Weiter geht es mit der Installation der avr-libc
avr-libc compilieren
Die Compilation der avr-libc gestaltet sich ähnlich. Folgende Befehle sind auszuführen:
$ tar xjf avr-libc-2.2.1.tar.bz2

$ cd avr-libc-2.2.1/

$ mkdir build

$ cd build/

$ ../configure --build=`./config.guess` --host=avr --prefix=$HOME/bin/avrgcc-15/

$ make -j 2

$ make install
Die Kompilation dauert etwa drei Minuten.
Danach ist die Installation komplett und wir können mit dem Beispiel Projekt weiter machen.
Ein kleines Testprojekt
Die Hardware
Wir beginnen mit einer kleinen Testschaltung, die du dann später erweitern kannst. Unser Testprogramm, so wie es hier dargestellt ist, bringt einfach eine LED zum Blinken. Man kann fertige Experimentierboards nutzen oder sich eine kleine Schaltung selbst zusammen löten. Das Beispiel ist für den ATmega8 geschrieben, kann aber leicht auf andere Typen angepasst werden.

Schaltplan und Pinbelegung
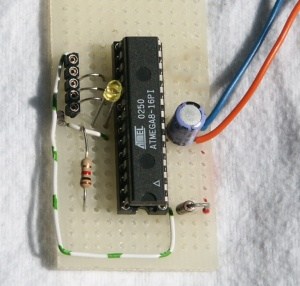
Aufgebaute Schaltung
Ein externer Kristall an dem Mikrocontroller ist für dieses Beispiel nicht notwendig, da der eingebaute Oszillator benutzt wird der von Werk aus auf 1MHz eingestellt ist.
Die Software
Ein guter Start für die Programmierung von Mikrocontroller ist das AVR-GCC Tutorial [6] und, natürlich, das Datenblatt des verwendeten Kontrolles.
Viel besser als alle Theorie ist ein richtiges Beispiel. Wir schreiben ein kleines Programm, das unsere LED blinken lässt. Nicht sehr nützlich, aber sehr gut für den Anfang.
Ihr könne es hier runterladen: avrblink10zip Das zip enthält den folgenden Quelltext und eine Makefile.
/*
 * blink.cpp
 * ATmega8 mit 1 MHz
 * PORTB wird ueber ein Timer alle 0.263s ein- und ausgeschaltet. Das entspricht 3.81Hz
 *
 * Der Takt beträgt 1Mhz. Der Timer Prescaler ist auf 1024 eingestellt und ein 8 Bit Timer
 * läuft nach 256 Increments über. Also
 * 1000000Hz / 1024 / 256 = 3.81Hz
 */

#include <avr/io.h>
#include <avr/interrupt.h>

// Overflow Interrupt Routine von Timer 0
ISR(TIMER0_OVF_vect) {
  // PORTB inventieren
  PORTB =~ PORTB;
}

int main() {
  // PORTB als Ausgang schalten
  DDRB  = 0xFF;
  // Alle Ausgaenge auf 0 schalten
  PORTB = 0x00;

  // Prescaler von Timer0 auf 1024 stellen
  TCCR0 |= (1 << CS02) | (1 << CS00);
  // Timer 0 Overflow Interrupt aktivieren
  TIMSK  |= (1 << TOIE0);

  // Interrupts einschalten
  sei();

  // Endlosschleife. Hier ist kein weiterer Code nötig.
  // Das Ein und Ausschalten der LED geschiet in der Overflow Interrupt Routine
  for(;;);
}
Die reichlichen Kommentare im Quelltext kommentieren ihn hoffentlich ausreichend.
Kommen wir zum Makefile. Ich hab es extra super super super einfach gehalten, da das Ziel dieses Artikel nicht ist, Makefiles zu schreiben, sondern schnell das Beispiel erfolgreich zu bestreiten.
all:
        avr-g++ -O1 -Wall -Wextra -Wconversion blink.cpp -mmcu=atmega8 -o blink.elf
        avr-objcopy -O ihex blink.elf blink.hex

load:
        avrdude -p m8 -c avr911 -P /dev/ttyUSB0 -U flash:w:blink.hex:i

clean:
        rm -f *.o *.hex *.elf
Das Makefile besteht aus drei Targets "all", "load" und "clean". Zum compiliere des Quelltest, zum hochladen auf den Mikrocontroller und zum entfernen der compilat Datein. Die Angabe des Mikrocontroller Typs "atmega8" geschiet direkt mit der Compiler Option "-mmcu" und nicht über eine extra Makefile Variable, um die Sache einfacher zu halten. Wenn das Projekt wächst kann das Makefile entsprechend erweitert werden. Achtet unbedingt achten, daß die Einrückungen im Makefile explizit durch TABs erfolgen und nicht durch Leerzeichen! Das ist nervig, aber das ist nunmal so...
Die Optionen "-Wall -Wextra -Wconversion" schalten viele Warnings ein. Auch solche die Anzeigen wenn einen implizite conversion statt findet. Also z.B. 16bit auf 8bit Integer was auf einem 8Bit Mikrocontroller nicht unbedingt das ist, was man eigentlich programmieren wollte. So kann man viele Stellen finden die möglicherweise Fehler enthalten und potentiell ein paar Instrutionen sparen. Denn das Debuggen auf einem Mikrocontroller ist schwer bis garnicht möglich.
Allgemeine Fehlermeldungen
Fehlermeldungen sollten eigentlich keine vorkommen. Wenn doch, vergewissert euch, dass ihr euch genau an die Anleitung gehalten und nichts falsch abgeschrieben habt!
Hier ein paar typische Fehlermeldungen und ihr Lösungen:
Permission denied
Ihr habt nicht die Rechte, um diesen Befehl auszuführen. In dieser Anleitung müssen nur die Befehle zum installieren mit apt-get als root (also mit su oder sudo) ausgeführt werden.
programmer is not responding
Es kann keine Verbindung zum Programmer aufgenommen werden: Defektes Kabel, Programmer an der falschen Schnittstelle angeschlossen (default: /dev/ttyS0 statt z.B. /dev/ttypUSB0), kein Strom am Programmer etc.
Fehlermeldungen beim compilieren von AVR GCC
/usr/bin/ld: .libs/hwasan.o: relocation R_X86_64_PC32 against undefined symbol `__ehdr_start' can not be used when making a shared object; recompile with -fPIC
Uh... Ich habe etwas rumgefrage und gegoogelt und am wahrscheinlichsten ist es, dass das Linux einfach zu alt ist. Ich bekam den Fehler bei einem ubuntu 19.04.
Links
[1] https://rn-wissen.de/wiki/index.php/Avr-gcc_und_avrdude_installieren by Me 2006, GCC
[2] https://web.archive.org/web/20080611141419/http://www.tldp.org:80/linuxfocus/English/November2004/article352.shtml Guido Socher 2008, GCC 3.4, Example with ATmega8 (Englisch)
[3] http://www.linuxfocus.org/Deutsch/November2004/article352.shtml Selber Artikel in Deutsch
[4] https://web.archive.org/web/20080611143624/http://www.tldp.org/linuxfocus/English/March2002/article231.shtml Guido Socher 2002, GCC 3.0, Example with AT90S4433 (Englisch)
[5] http://roboblog.fatal-fury.de/?p=4076 GCC 8 compilieren
[6] https://www.mikrocontroller.net/articles/AVR-GCC-Tutorial
[7] https://github.com/avrdudes/avrdude/
[8] https://gcc.gnu.org/install/
Comments Off on AVR-GCC 15 für Linux installieren / compilieren
09.04.2023
Cleanup your messy backup
Cleanup your messy backup by hand could be fun! Kinda of. The goal is to remove duplicated files and organize the files into a new structure.
First of all lets record the free disk space over time.
Consider this script which collects the free space over time in a file:
$ cat freespace.sh
date | tr  '\n' ' ' | tee -a freespace_overtime
df -h . | tail -n 1 | tee -a freespace_overtime

$ cat freespace_overtime
Sun 09 Apr 2023 08:24:59 AM CEST /dev/sdb1      1008G  779G  178G  82% /mnt
Now lets try to find some things like local Qt and boost installations, check the downloads/ and opt/ folders, .Trash/ .wine build/ .hg .svg git .local .cache .mozilla .dropbox java .steam bin/ , linux- kernel source, other obsolete downloads and delete them. Also check for hidden directories and hidden files...
Local Qt installation are usually in the folder "QtSDK" or "Qt-*". The -prune option tell find to stop the recursion when find a matching folder.
find . -type d -iname "QtSDK*" -prune
./backup/kater_12.01.2018/kater/QtSDK

find . -type d -iname "Qt-*" -prune
./backup/kater_12.01.2018/kater/Qt-1.6.0
find . -type d -iname "*.java*" -prune
6GB good start
Find boost installations
$ find . -type d -iname "boost*" -prune
./backup/kater_12.01.2018/kater/download/boost_1_64_0
Almost 1GB for me.
Usually there is a lot of stuff in the downloads folder which can be removed
$ find . -type d -iname "*download*" -prune
Cleaned up 14GB!
More obsolete stuff in opt/ folders.
find . -type d -iname "opt" -prune
Only 1GB this time.
Find trash bins.
find . -type d -iname "*trash*"
./.Trash-1000
./backup/backup_80GB_HDD/backup_festrechner_13.03.2012/kater/.local/share/Trash
5GB Trash... Be aware don't delete your regular backup files. Because there is no other backup ;)
Old wine folders can be interesting. ...
find . -type d -iname ".wine" -prune
But not this time.
Finding old build folders result in a lot of false positives.
$ find . -type d -iname "*build*" -prune
2GB for me.
Old Mercurial hidden folders. Delete them all!
$ find . -type d -iname ".hg" -prune
And old subversion folders too. Gosch I have over 200 of them
find . -type d -iname ".svn" -prune | xargs rm -fr
Don't forget to delete the git folders too! They should be in the cloud anyway ;)
find . -type d -iname ".git" -prune
Wow 11GB. Guess I deleted some other things too XD
Nicht wirklich was zu holen bei .local.
find . -type d -iname ".local" -prune
Immerhin 1GB bei .cache
find . -type d -iname ".cache" -prune
Nur 700MB. Weg damit. Wenn da was wichtiges gespeichert wäre, hätte man es an anderer Stelle nochmal gespeichert.
find . -type d -iname ".mozilla" -prune
Dropbox haha als sich "Cloud" anfing durchzusetzen.
find . -type d -iname "*dropbox*" -prune
Haha Java weine ich keiner Träne nach
find . -type d -iname "*.java*" -prune
Mit Steam ist das eigentlich so eine Sache, aber auf der anderen Seite kann man alles neu runterladen. Man hat es ja gekauft...
find . -type d -iname "*.steam" -prune
1.3GB!
Unglaublich was sich so alles in bin/ Ordner versteckt.
find . -type d -iname "bin" -prune
Immerhin 6GB.
Versteckte Ordner sind ja auch so einen Sache von denen man nichts weiß und ergo auch nicht braucht.
$ find /mnt -type d -iname ".*" -prune
Das waren auch ein paar GB...
Und versteckte Dateien erst. Was sich da an Müll ansammelt
$ find /mnt -type f -iname ".*" -prune
Diese dummen autoerstellen thumbnail Dateien können auch weg.
find . -iname "thumbs.db" -print0 | xargs -0 du -ch
Nur 40MB aber Müll ist Müll.
Beim erstellen von Half Life Maps entstanden früher jeden Menge Mülldatein beim compilieren. Diese haben die Endung p0 p1 p2 p3 prt pts wic lin max und können nach kurzer Sichtung alle gelöscht werden.
find . -iname "*.p0" -print0 | xargs -0 du -ch
find . -iname "*.p1" -print0 | xargs -0 du -ch
find . -iname "*.p2" -print0 | xargs -0 du -ch
find . -iname "*.p3" -print0 | xargs -0 du -ch
find . -iname "*.prt" -print0 | xargs -0 du -ch
find . -iname "*.pts" -print0 | xargs -0 du -ch
find . -iname "*.wic" -print0 | xargs -0 du -ch
find . -iname "*.lin" -print0 | xargs -0 du -ch
find . -iname "*.max" -print0 | xargs -0 du -ch
Bei den .prt Datein hat sich _EINE_ Datei aus NFSp reingemogelt die nicht gelöscht werden sollte.
Kanpp 1k Datei und 62M.
Comments Off on Cleanup your messy backup
06.11.2022
skip and hint brushwork in praxis
Hi All!
I want to show you some skip and hint brushwork in praxis.
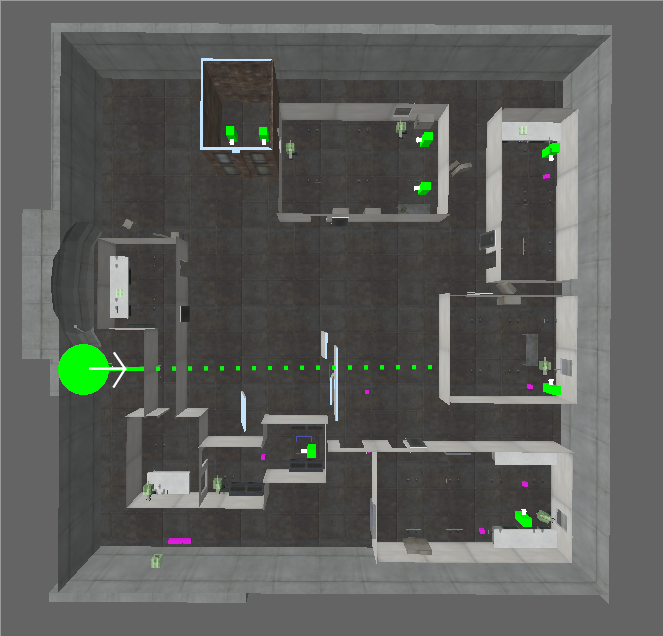
First I'll show you an overview of the map. The big green dot is where I take the sceenshots in game. And the line of sigth is blocked by one of the walls of the small room.
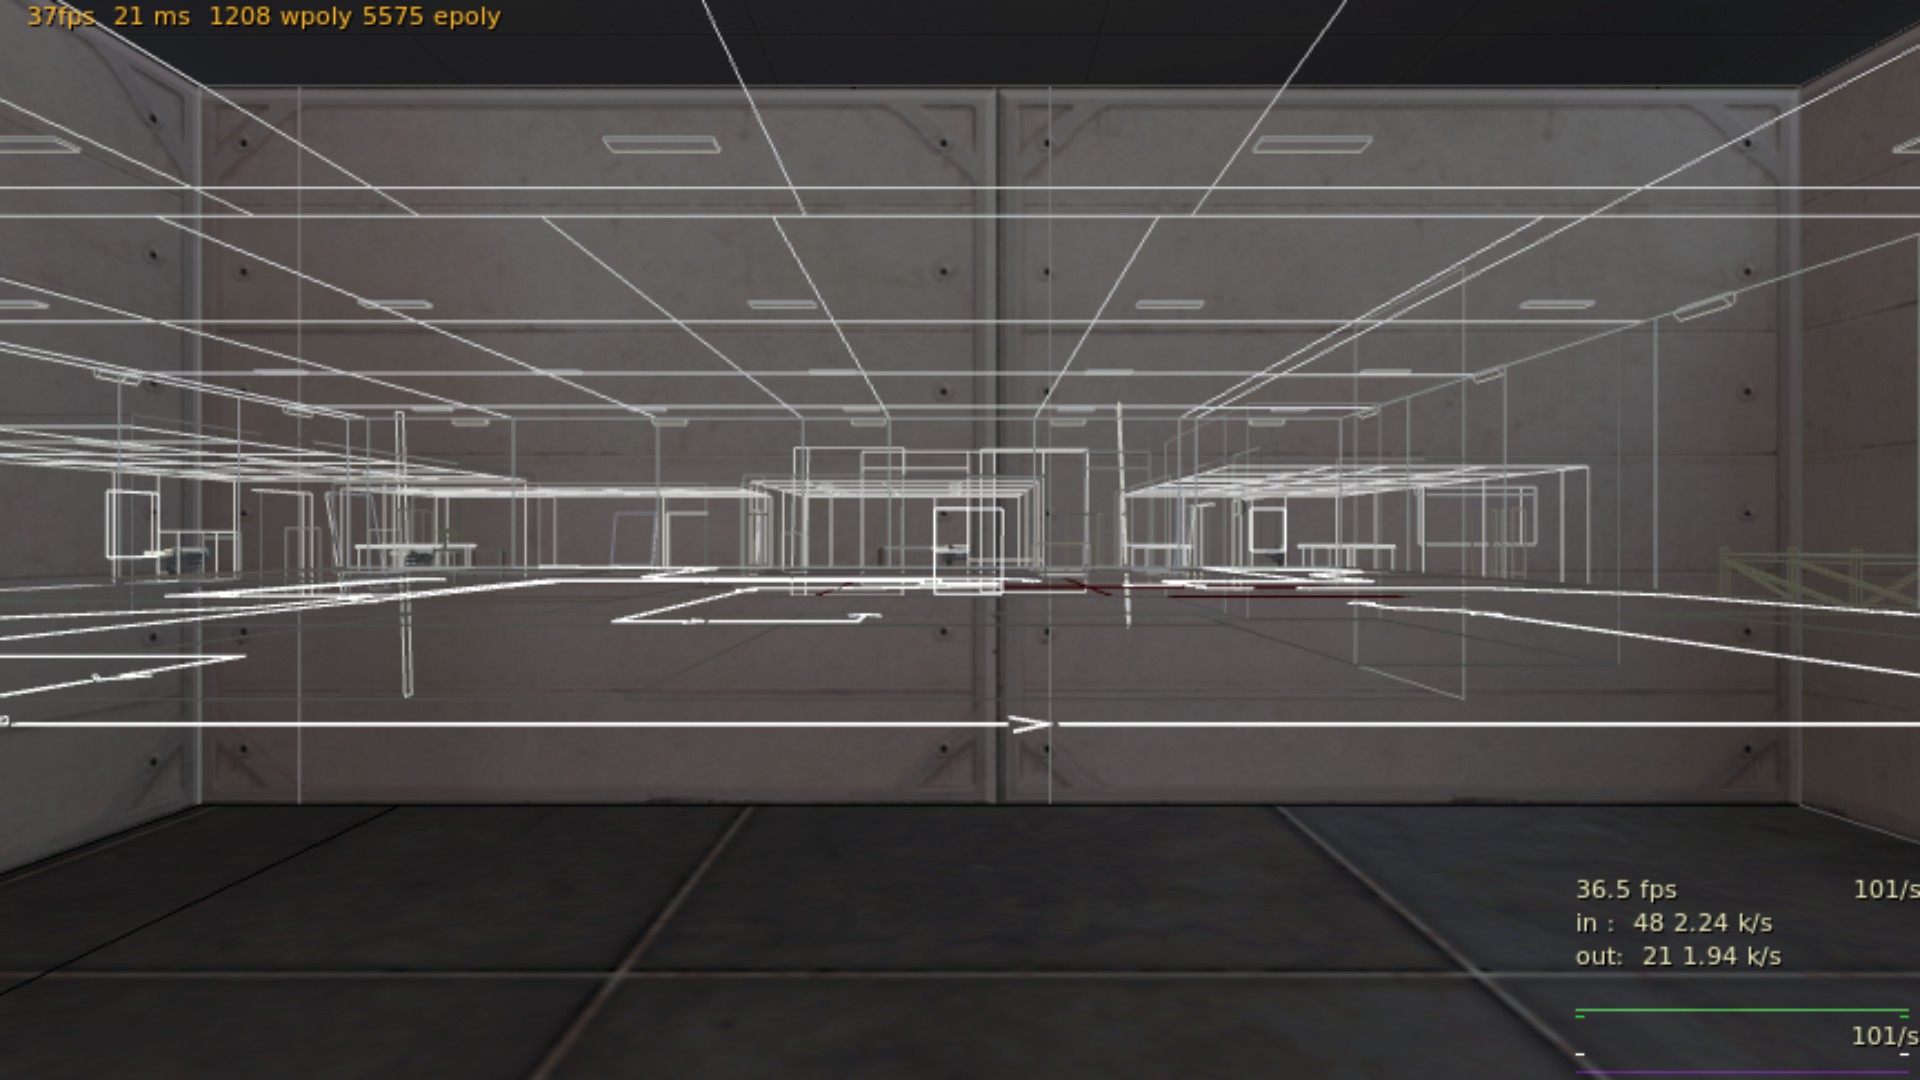
But If you enable r_speeds 1 and gl_wireframe 2 in game, you see in the next screenshot pretty much everything from the map is rendered. Although the small building (with the NULL texture on top) blocks line of sight. 1200 wpoly nd 5500 epolys are rendered.
To understand this, we'll load vis portal into J.A.C.K. They are stored in the .prt file but first you have to edit the file, otherwise it wont load. Open the file with a simple text editor. Keep the first two lines, then remove every line till the first line with the round brackets. (The number of lines you have to delte is the first number in the file.) It should then look like this:

Or use the tool fixprt. You can download it here https://gamebanana.com/tools/6786
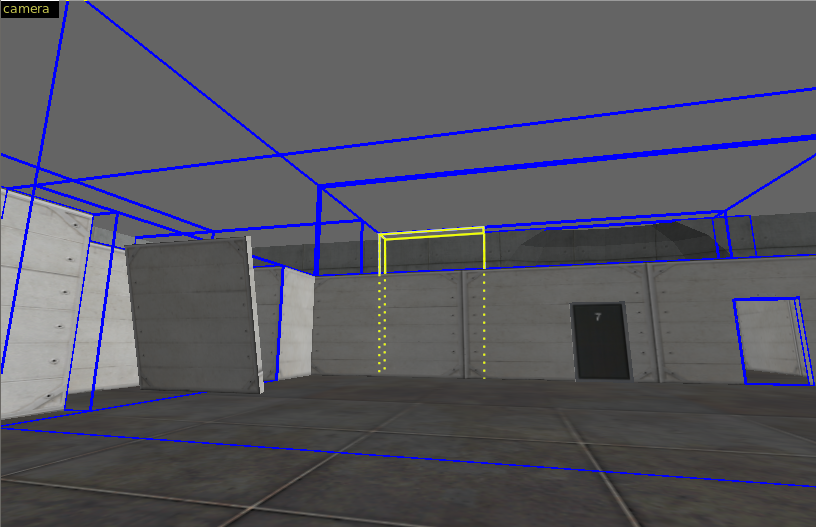
In the next image you see some vis portals in blue which I loaded into J.A.C.K via Menu - Mmap - Load Portal File. There are two vis leafs marked. One in yellow and one in magenta. The start point is in the yellow leaf which goes up to the ceiling. The reason why pretty much everything
is visible from the startpoint is, because its visible from the yellow portal. It dosen't matter the position of the player.

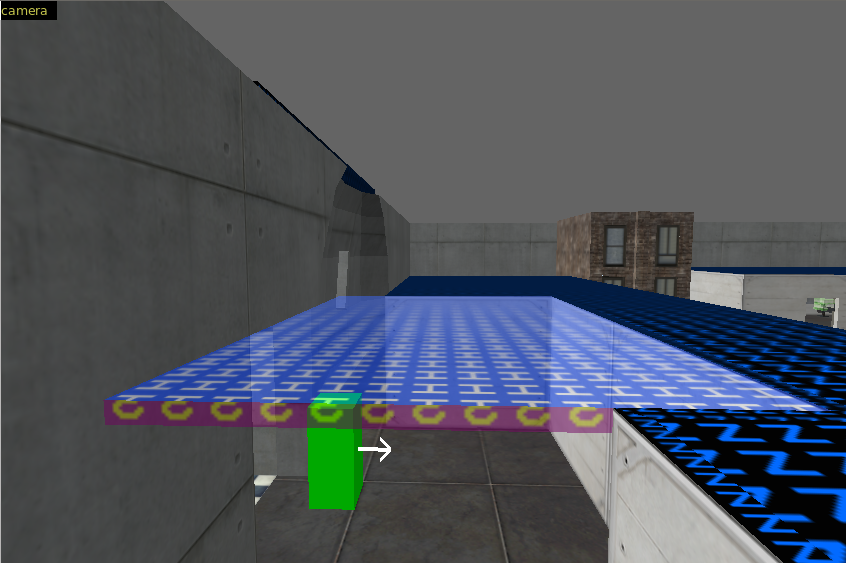
For better understanding I also make a screenshot in J.A.C.K form the opposide of the map where you can see the yellow leaf. As you can see in the next image.
In the next immage the player position is in the magenta leaf, right in front of the wall. Now only the sourounding walls of the map itself are rendered (and the lights (func_detail) and some other stuff on the ground (func_illusionary)). The magenta vis leaf is as high as the small room with the NULL texture.

How we can achieve this? We have to decrease the hight of the yellow leaf to the hight of the small room. We simply split the leaf with the hint texture. In the next image you can see the brush I made. One side with the skip texture and the other with the skip texture. The hint side face up while will2k suggest to face it down. I don't know if there is any technical reason for this. It shoudlnt be. I like to few my maps from top. So put the hint texture on top of the brush make it easyer to see it in J.A.C.K.
After running the compiler and load in the new vis leafs file, the leafs are cutted at the height of the small room. I marked the leafs in magenta as you can see in the next image.
I started the game and take a screenshot from the start positon of the player. It works! The wpolys drops from 1200 to 533 and the epolys from 5500 to 375. (56% and 93% saved. It was worth it!)

==============================
Next I'll show you how vis portals/leafs are good to detect world brushes which are potential good for func_detail.
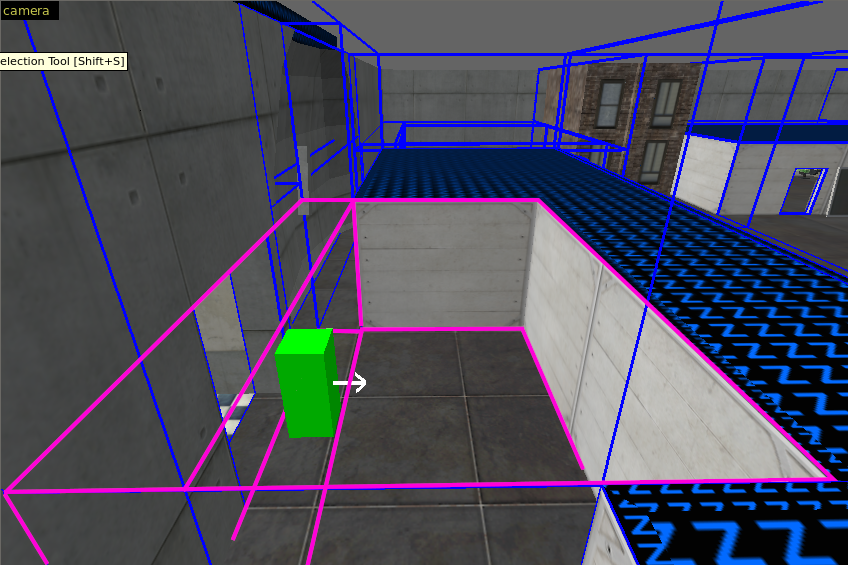
Here I made a lamp hanging from the ceiling. I forgot to turn it into a func_detail and as a result, the vis portals/leafs are cutted according to the rotation of the brush. This really looks not right.
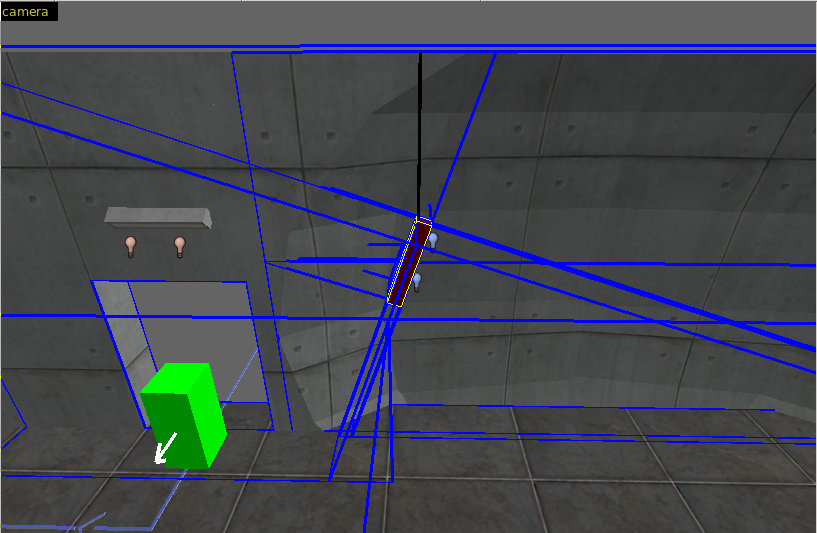
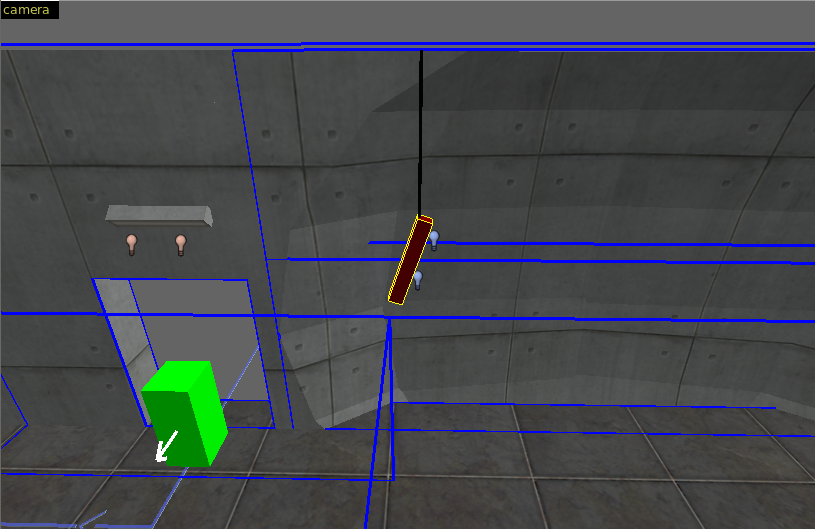
After changing the light brush to func_detail, run compiler, load prt file, the vis leafs/portals look way better :) And of cource the number of vis leafs/portals decreates, which is good (usually).
Thats all for today. Many Thanks to theBoss and bluesed for their patience and endlos tips :)
Here are somegood links:
twhl goldsource tutorials https://twhl.info/wiki/page/category%3AGoldsource_Tutorials
from will2k
A Systematic Approach to Level Design https://gamebanana.com/tuts/10747
Planning To Win Sketching Your Level https://gamebanana.com/tuts/10980
Winning your optimization battle against the source engine https://gamebanana.com/tuts/11178
Optimization Testing in Source Engine https://gamebanana.com/tuts/11586
the wall (german) https://thewall.hehoe.de/
r_speeds und ihre Optimierung https://thewall.hehoe.de/artikel/r_speeds/r_speeds.html
Comments Off on skip and hint brushwork in praxis
17.09.2022
C++ Guns: throw and catch all standard exceptions for fun
This example throw and catch all standard exceptions just for fun
exception list from https://en.cppreference.com/w/cpp/error/exception
sorted after C++ Standard
searching a stack trace? look at https://en.cppreference.com/w/cpp/utility/basic_stacktrace
/* This example throw and catch all standard exceptions just for fun
 * exception list from https://en.cppreference.com/w/cpp/error/exception
 * sorted after C++ Standard
 *
 * searching a stack trace? look at https://en.cppreference.com/w/cpp/utility/basic_stacktrace
 */

#include <iostream>
#include <exception>
#include <future>
#include <regex>
#include <filesystem>
#include <chrono>
#include <any>
#include <optional>
#include <variant>
//#include <format> // C++20. Not implemented in GCC 12
// #include <expected> // C++23


int nCatched = 0;

template<typename T>
void check(const T& ex, std::string_view exceptionType) {
  nCatched++;
  std::string_view what(ex.what());
  // only compare the first chars from what() message, we are not intereseting in stuff after the exception type
  if(what.substr(0,exceptionType.size()) != exceptionType) {
      std::cerr << exceptionType << " what(): " << ex.what() << "\n";
      std::cerr << "\nERROR: Not all exception derived from " << exceptionType << " catched...\n";
      ::exit(EXIT_FAILURE);
    }
}

int main() {

  bool finish = false;
  int nThrow = 0;
  while(not finish){
    try {
      switch(nThrow) {
        case  1: ++nThrow; throw std::exception();
        case  2: ++nThrow; throw std::logic_error("std::logic_error");
        case  3: ++nThrow; throw std::invalid_argument("std::invalid_argument");
        case  4: ++nThrow; throw std::domain_error("std::domain_error");
        case  5: ++nThrow; throw std::length_error("std::length_error");
        case  6: ++nThrow; throw std::out_of_range("std::out_of_range");
        case  7: ++nThrow; throw std::runtime_error("std::runtime_error");
        case  8: ++nThrow; throw std::range_error("std::range_error");
        case  9: ++nThrow; throw std::overflow_error("std::overflow_error");
        case 10: ++nThrow; throw std::underflow_error("std::underflow_error");
        case 11: ++nThrow; throw std::bad_typeid();
        case 12: ++nThrow; throw std::bad_alloc();
        case 13: ++nThrow; throw std::bad_exception();
        case 14: ++nThrow; throw std::regex_error(std::regex_constants::error_collate); // C++11
        case 15: ++nThrow; throw std::system_error(ENOENT, std::system_category(), "std::system_error"); // C++11
        case 16: ++nThrow; throw std::ios_base::failure("std::ios_base::failure"); // C++11
        case 17: ++nThrow; throw std::future_error(std::future_errc::broken_promise); // C++11
        case 18: ++nThrow; throw std::bad_weak_ptr(); // C++11
        case 19: ++nThrow; throw std::bad_function_call(); // C++11
        case 20: ++nThrow; throw std::bad_array_new_length(); // C++11
        case 21: ++nThrow; throw std::filesystem::filesystem_error("std::filesystem::filesystem_error", std::error_code(ENOENT, std::system_category())); // C++17
        case 22: ++nThrow; throw std::bad_any_cast(); // C++17
        case 23: ++nThrow; throw std::bad_optional_access(); // C++17
        case 24: ++nThrow; throw std::bad_variant_access(); // C++17
        // case 25: throw std::chrono::nonexistent_local_time(); // C++ 20. Not implemented in GCC 12
        // case 26: throw std::chrono::ambiguous_local_time(); // C++20. Not implemented in GCC 12
        // case 27: throw std::format_error(); // C++20. Not implemented in GCC 12
        // case 28: throw std::bad_expected_access(); // C++23
        // case 29: throw std::tx_exception(); TODO
        default: {
          finish = true;
        }
      }
    }
    catch(std::bad_variant_access& ex) {
      check(ex, "bad variant access");
    }
    catch(std::bad_exception& ex) {
      check(ex, "std::bad_exception");
    }
    catch(std::bad_array_new_length& ex) {
      check(ex, "std::bad_array_new_length");
    }
    catch(std::bad_alloc& ex) {
      check(ex, "std::bad_alloc");
    }
    catch(std::bad_function_call& ex) {
      check(ex, "bad_function_call");
    }
    catch(std::bad_weak_ptr& ex) {
      check(ex, "bad_weak_ptr");
    }
    catch(std::bad_optional_access& ex) {
      check(ex, "bad optional access");
    }
    catch(std::bad_any_cast& ex) {
      check(ex, "bad any_cast");
    }
    catch(std::bad_typeid& ex) {
      check(ex, "std::bad_typeid");
    }
    catch(std::filesystem::filesystem_error& ex) {
      check(ex, "filesystem error");
    }
    catch(std::ios_base::failure& ex) {
      check(ex, "std::ios_base::failure");
    }
    catch(std::system_error& ex) {
      check(ex, "std::system_error");
    }
    catch(std::regex_error& ex) {
      check(ex, "Invalid collating element in regular expression"); // regex_error.what does not print the exception type first...
    }
    catch(std::underflow_error& ex) {
      check(ex, "std::underflow_error");
    }
    catch(std::overflow_error& ex) {
      check(ex, "std::overflow_error");
    }
    catch(std::range_error& ex) {
      check(ex, "std::range_error");
    }
    catch(std::runtime_error& ex) {
      check(ex, "std::runtime_error");
    }
    catch(std::future_error& ex) {
      check(ex, "std::future_error");
    }
    catch(std::out_of_range& ex) {
      check(ex, "std::out_of_range");
    }
    catch(std::length_error& ex) {
      check(ex, "std::length_error");
    }
    catch(std::domain_error& ex) {
      check(ex, "std::domain_error");
    }
    catch(std::invalid_argument& ex) {
      check(ex, "std::invalid_argument");
    }
    catch(std::logic_error& ex) {
      check(ex, "std::logic_error");
    }
    catch(std::exception& ex) {
      check(ex, "std::exception");
    }
  } // while


  if(nThrow != nCatched) {
    std::cerr << nThrow << " exception thrown but " << nCatched << " catched\n";
  } else {
    std::cout << "All exceptions which was thrown was catched\n";
  }

  return EXIT_SUCCESS;
}
$ ./a.out
All exceptions which was thrown was catched
Comments Off on C++ Guns: throw and catch all standard exceptions for fun